Hands-On Project 2-3: Calculate the Subnet Mask for a Required Number of IPv4
Objective: Learn how to determine the subnet mask required to support a specific number of subnets on an IPv4 network using the GestióIP IPv4/IPv6 subnet calculator.
Description: In this project, you use the GestióIP IPv4/IPv6 subnet calculator to define a range of network and host addresses that can be used on a subnetted Class C network. The network number assigned to you is 192.168.0.0. Define a network addressing system that supports 24 networks by subnetting the given address.
- Open a Web browser and go to gestioip.net/cgi-bin/subnet_calculator.cgi.
- Above the IP address field, verify that IPv4 is selected (it should be selected by default).
- In the IP address field, enter the IPv4 address 192.168.0.0.
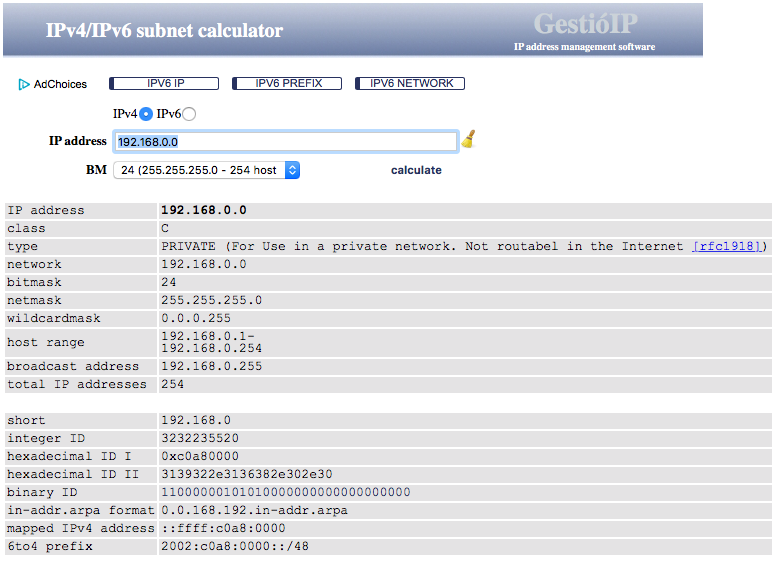
- Open the BM drop-down menu, scroll down under Class C, select 24 (255.255.255.0 – 254 hosts), and then click calculate. The results should be similar to what is shown in Figure 2-9. Figure 2-9 Results of the IPv4 calculation Source: Marc Uebel, GestióIP
- Review the information generated on the page and notice that in addition to information about the IPv4 Class C subnet you have calculated, you can find, in the last two fields at the bottom, the IPv4 address mapped to IPv6 as well as the 6to4 prefix.
- When finished, close the Web browser.
Hands-On Project 2-4: Learn IPv4 Subnetting Using an Online Tutorial
Description: In this project, you visit the Ralph Becker “IP Address Subnetting Tutorial” Web site and step through the tutorial. You need a computer with Internet access and a Web browser to complete this project.
- Open a Web browser and go to www.ralphb.net/IPSubnet/index.html.
- Step through the IP Address Subnetting Tutorial, which provides information about and examples of IP subnetting.
- When finished, close the Web browser.
Hands-On Project 2-5: Determine the Host Address Range, Broadcast Address, and Other Associated Values for an IP Address Using a Subnet Calculator
Description: Using the online subnet calculator at www.subnet-calculator.com/, you will learn how making a single change to the number of subnets for an IP address changes multiple aspects associated with the subnet.
- Open a Web browser and go to www.subnet-calculator.com. Notice that the default IP address is 192.168.0.1, with a subnet mask of 255.255.255.0, no subnet bits set, and a maximum number of subnets of 1.
- Open the Maximum Subnets drop-down list and change the value from 1 to 4.
- Using a pen and paper, or Word or Excel, record the new values for the subnet mask, subnet bits, mask bits, hosts per subnet, host address range, and broadcast address.
- In the Subnet Calculator interface, select the Network Class A radio button. The IP address should change to 10.0.0.1.
- Open the Subnet Mask drop-down list and change the mask to 255.255.0.0.
- Write down the new values for subnet bits, maximum subnets, mask bits, hosts per subnet, host address range, and broadcast address and compare them to the first set.
- Continue experimenting with different network classes and subnet masks and notice how the values change. When you are done, close the Web browser.
Hands-On Project 2-6: Review RFCs Related to IPv6 Addressing
Description: In this project, you access the IETF Web site to look for information about RFCs related to IPv6 addressing. You need a computer with Internet access and a Web browser to complete this project. Feel free to spend some time browsing this Web site after you complete the steps.
To examine RFC 4291:
- Open a Web browser and go to https://tools.ietf.org/html/rfc4291.
- Read the paper “IP Version 6 Addressing Architecture.” Leave the Web browser open when you are finished.
To examine RFC 6052:
- Scroll to the top of the page.
- In the menu at the top, click Docs.
- In the RFC number, draft name (full or partial) or URL field, enter 6052, and then click Get Document.
- Read the paper “IPv6 Addressing of IPv4/IPv6 Translators.”
- Close the Web browser when you are finished.
Please provide general comments about points you learned by reading both of the RFC’s
Hands-On Project 2-10: Access and Work With an ARP Table in Windows
Description: The ARP is used to map Data Link layer addresses to a hardware address recognized on the local network. You need to access your computer’s command-line interface; and, ideally, your computer should have previously communicated with one or more computers on the network. The computer should be running Windows 7 or Windows 10.
- Open a command prompt window. (Use the Start menu search box or the Search box on the task bar. Type cmd and then press Enter. A command prompt window opens.)
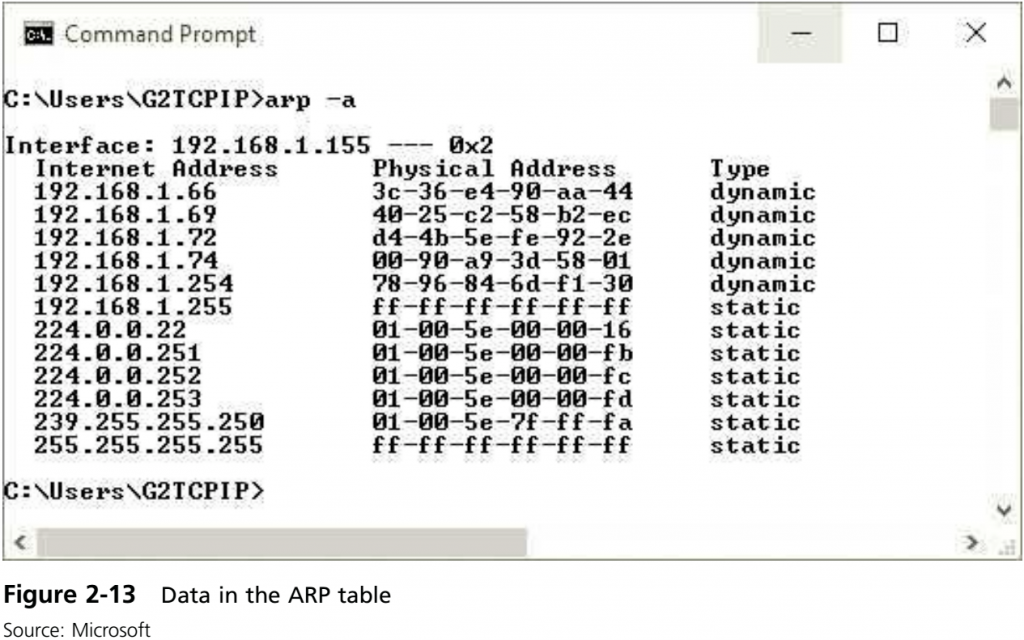
- At the command prompt, type arp -a and press Enter.
- Review the ARP table for the interface of your computer, noting the Internet address, physical address, and connection type for each entry, as shown in Figure 2-13.
- Type arp -d to delete the entries in the ARP table. (If this operation fails, you may need to run cmd.exe as an administrator. To do so, close the command prompt window, enter cmd in the Start menu search box [Windows 7] or the Search box on the task bar [Windows 10], and in the search results, right-click the command prompt entry and select Run as administrator. Then run the arp -d command again.)
- Type arp -a again and notice that the table is empty or greatly reduced.
- Ping a host on the Internet such as www.google.com.
- Type arp -a again and notice the addresses added to the ARP table.
- Close the command prompt window.